


Instalacja Jabbera na serwerze
Step 1 – Install eJabberd
apt-get -y install ejabberd
Step 2 – Setup Admin User
Change „password” to your own value:
ejabberdctl register admin localhost password
Give Admin Privileges
By default, hostname used by eJabberd is 'localhost’, which can be modified in config file.
For our example we will call our admin user „admin@localhost” and modify the following lines in/etc/ejabberd/ejabberd.cfg:
%% Admin user
{acl, admin, {user, "admin", "localhost"}}.

%% Hostname
{hosts, ["localhost"]}.
Restart eJabberd
service ejabberd restart
Now you can navigate to your eJabberd Web Admin interface on droplet’s IP address port 5280:
http://198.199.90.115:5280/admin
The login username is user@domain („admin@localhost” in our case):

From the web admin interface you can modify all the settings:

Adding New Users
From the web admin interface, click Virtual Hosts -> localhost -> Users
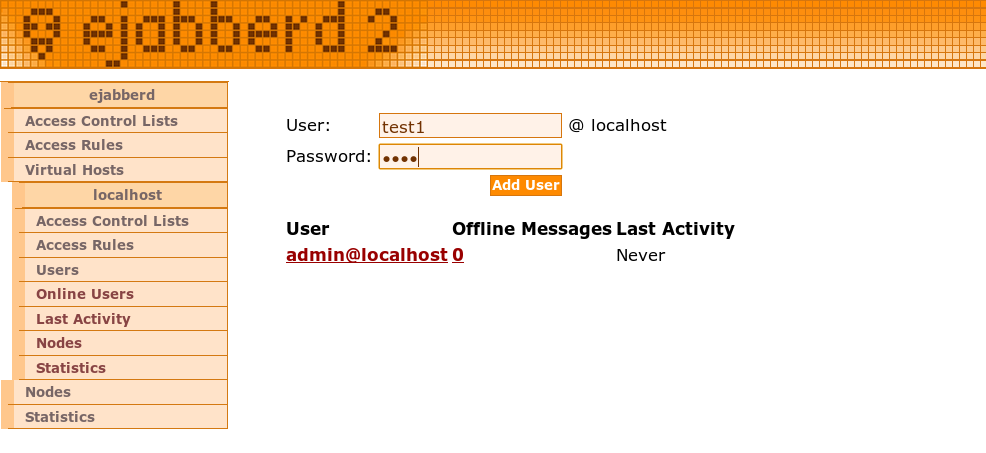

You can also add a user, using command line via SSH:

Now you can install a client like Pidgin to connect to XMPP:

Remember to use port 5222 to connect to your XMPP server, using encryption:

Adding Users to your Buddy List
Using Pidgin, you can either press CTRL+B or from menu „Buddies” -> „Add Buddy” to buddies:

Your buddy would receive a friend request that they would have to authorize:

Now you will be able to communicate securely using XMPP and OTR encryption module via Pidgin:

And you are all done!
If you don’t know XMPP or Jabber, you should check out the Wikipedia page about it: http://wikipedia.org/wiki/XMPP.
In general, it’s an instant messaging service, like Yahoo Messenger, MSN, ICQ or Skype, to exchange messages live with other friends. As a client we suggest Pidgin, but there are many more clients for every platform and any device. You can find a list here:http://xmpp.org/xmpp-software/clients/.
After downloading and installing Pidgin, go through the following steps:

Here you just need to hit „Add…” to create a new account:

In this menu you need to choose XMPP for the protocol out of the dropdown. Then you can choose the username you want to use on the server. Your XMPP address will then be: thisusername@dukgo.com. As the domain name you must of course set dukgo.com :-).
The resource can actually be empty, it’s an optional value which „defines” your instance of the Pidgin for others, if you have several locations you chat from. Now you can choose a password, which you can also define directly, so that you don’t need to remember it. The values under User Options are totally local and are all up to you.
If you don’t have any account on community platform yet, then it is important that you hit the small „Create this new account on the server” checkbox! If you are just using an existing account on community platform, the checkbox must be off.
Then hit „Add” to get to the next step:

This is all prefilled, so you just hit the „Register” button to go on:

Yeah you did it! 🙂 Don’t forget your password! 🙂 Now you actually need to do a bit more to use the account 🙂

You need to actually enable your account on this window, which should still be open for you. Just click the small checkbox on the enabled row to activate your account as seen on the screenshot:

Now you can „Add Buddy” or „Add Chat” to get more out of the XMPP experience 🙂
For example you can now add the DuckDuckGo Instant Messenger bot as your friend:

Then you have him in your buddy list, and you can click on him to write him a message and get something like this:

You can also „Add Chat” to add our DuckDuckGo Jabber Conference, it will soon be linked to the IRC channel #duckduckgo on freenode, but we welcome everybody already :-). Of course you can „Autojoin” if you want 🙂

So I hope you find this interesting and also ask your friends to play around with XMPP, it’s generally the only way to get instant messaging with your friends without the tracking of a centralized service, but still with secured usernames.
Thanks for using XMPP services 🙂
Źródło:
https://www.digitalocean.com/community/tutorials/how-to-install-ejabberd-xmpp-server-on-ubuntu.
https://duck.co/blog/post/2/using-pidgin-with-xmpp-jabber


